PC Bottleneck Calculator: Check CPU, GPU, and RAM Balance (Plus FPS and PSU Guidance)
Your PC can look “high-end” on paper and still feel choppy in the game you play most. That’s a bottleneck. One part hits its limit first, then everything waits. The tricky part: the limiter changes with resolution, refresh rate, and what you do: competitive 1080p, 4K single-player, streaming, or editing. A balanced build keeps frame times smooth and avoids wasted upgrades.
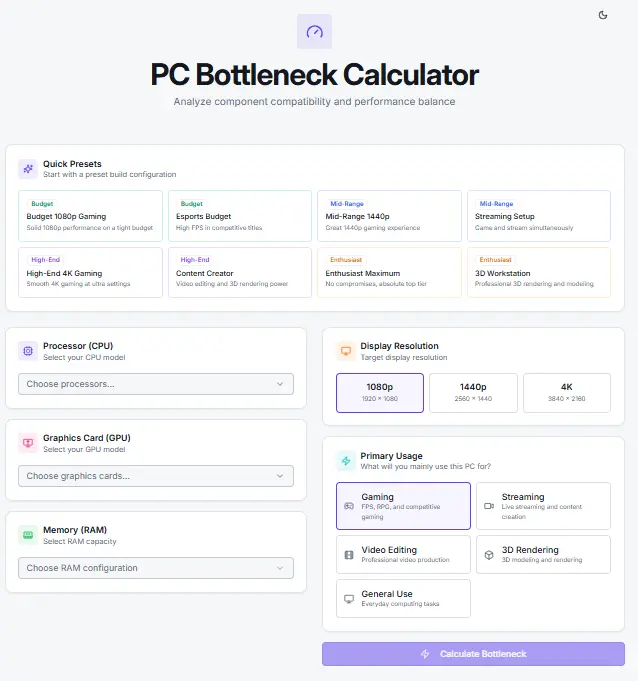
This PC Bottleneck Calculator turns that guesswork into a clear snapshot. Pick your CPU, GPU, and RAM. Choose your target resolution and purpose. Then you’ll see a bottleneck percentage, a simple verdict, and practical recommendations on what to change first. You’ll also get FPS estimates for games and a PSU sizing suggestion based on component power draw.
What a PC Bottleneck is (and What it is Not)
A PC bottleneck is simple: in a given workload, one component becomes the main limiter. That part tops out first, so your system can’t push higher frame rate (FPS) or finish the task faster, even if the other parts still have room.
The key words are “given workload.” Bottlenecks aren’t permanent labels. They change based on what you run and how you run it.
In competitive esports at 1080p with high refresh rates, the CPU often matters more. You’re chasing very high FPS, and the processor may struggle to feed the GPU fast enough. You’ll see high CPU utilization (sometimes on a few busy cores) while GPU utilization stays lower than expected.
Flip to 4K gaming with high settings, and the story often reverses. The GPU does more work per frame, so GPU utilization climbs and the frame rate becomes graphics-limited. In that case, a “GPU bottleneck” can be normal: it means you’re using your graphics card fully.
It’s also not just CPU vs GPU. RAM can be the limiter when capacity is too low, speeds are misconfigured, or you’re multitasking (game + browser + chat + streaming). That can show up as stutters, hitching, or sudden FPS dips, even if average FPS looks fine.
How to Use this PC Bottleneck Calculator
Using the calculator takes about a minute.
- Select your CPU from the dropdown.
- Select your GPU from the dropdown.
- Choose your RAM (capacity and memory type).
- Pick your resolution: 1080p, 1440p, or 4K.
- Choose your purpose/use case: gaming, streaming, video editing, 3D rendering, or general use.
- Click Calculate.
Why do resolution and purpose matter? Because bottlenecks don’t happen in a vacuum. At 1080p, especially with high refresh targets, the CPU can become the limiter sooner. At 4K, the GPU usually carries more of the load. Streaming and editing shift the balance again because encoding and timelines can stress CPU threads and memory more than a typical game.
Many competitor tools show a single percentage and stop there. This calculator gives you a preview of what’s driving the outcome. It uses different weighting for each resolution option and each use case, so the result matches what you’re actually trying to do.
After you calculate, review the results tabs to see your bottleneck percentage, verdict, recommendations, FPS estimates, PSU guidance, and a share-friendly summary.
Supported Hardware and Inputs (What You Can Select)
The calculator focuses on common, real-world PC parts people actually pair together. You pick components from searchable dropdowns, then choose your target setup.
CPU Support
- Intel: 10th through 14th Gen Core processors
- AMD: Ryzen Zen 3, Zen 4, and Zen 5 series
GPU Support
- NVIDIA: Ampere (RTX 30), Ada Lovelace (RTX 40), and Blackwell (RTX 50)
- AMD: RDNA 2 (RX 6000) and RDNA 3 (RX 7000)
- Intel: Arc (Alchemist)
RAM Options
DDR4 or DDR5, with common capacities: 8 GB, 16 GB, 32 GB, 64 GB, and 128 GB (depending on type). Memory limits can cause stutters, long load times, and rough multitasking even when your CPU and GPU look strong.
Additional Settings
- Resolution: 1080p, 1440p, or 4K
- Purpose: gaming, streaming, video editing, 3D rendering, or general use
Performance Score: What It Means
Each CPU and GPU has a performance score. Think of it as a clean, consistent “tier rating” the calculator uses to compare parts and balance a build. It’s not a promise of exact FPS in every game. It’s a way to measure relative strength across parts so the tool can spot mismatches fast.
What’s stored per component:
CPU: cores/threads, clocks, TDP, generation, performance score, price
GPU: VRAM, clocks, TDP, generation, performance score, price
RAM: type (DDR4/DDR5), capacity, price
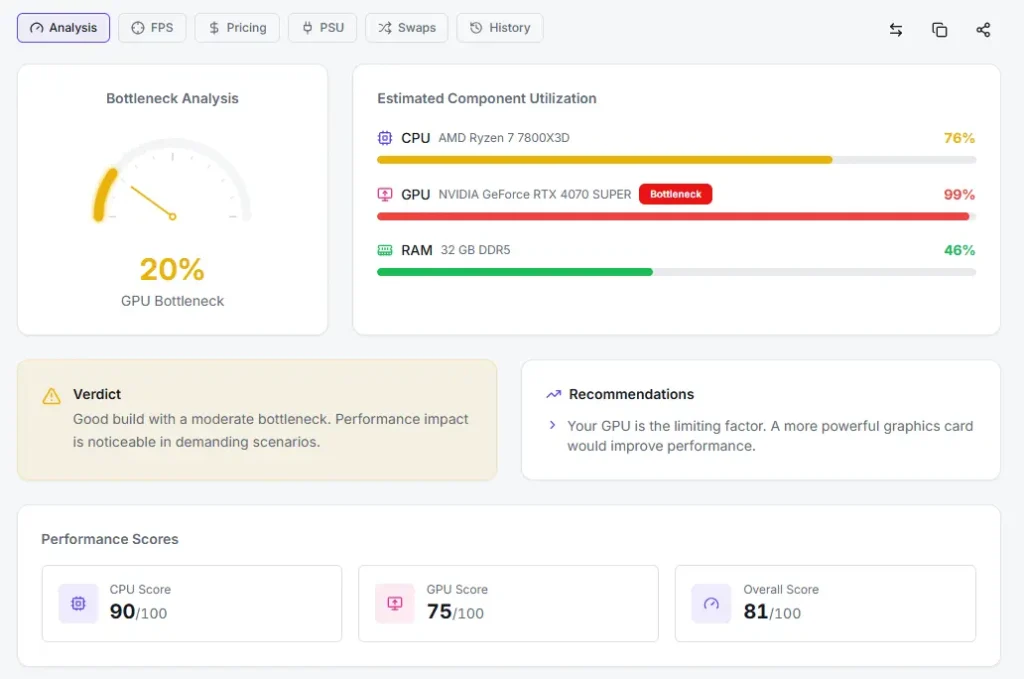
How to Read Your Results (What Each Metric Means)
Your results answer one main question: what part limits performance first for your setup and workload.
- Bottleneck % shows the size of the mismatch. A small number means your CPU, GPU, and RAM are close in capability. A larger number means one part holds the others back.
- The overall score (0–100) is the calculator’s quick “balance + strength” summary. It blends your CPU, GPU, and RAM using weights that change based on your purpose and resolution.
- Utilization bars (CPU/GPU/RAM) give you a visual read on load. If one part is the bottleneck, it will sit near the top. Use these bars as a direction sign, not a lab-grade measurement.
- Recommendations tell you what to do next—switching resolution, upgrading a limiting part, or increasing RAM.
- Verdict labels turn the numbers into plain English: excellent balance, good balance, moderate bottleneck, significant bottleneck, or severe bottleneck.
How the Core Bottleneck Calculation Works
Step 1: Purpose and Resolution Set the Weights
The calculator starts by deciding how much each part matters for your goal. It uses fixed weights for CPU, GPU, and RAM.
Gaming weights by resolution:
1080p: CPU 45%, GPU 50%, RAM 5%
1440p: CPU 35%, GPU 60%, RAM 5%
4K: CPU 25%, GPU 70%, RAM 5%
Higher resolution pushes more work to the GPU, so the GPU weight rises.
Other purpose weight sets:
Streaming: CPU 55%, GPU 35%, RAM 10%
Video editing: CPU 45%, GPU 40%, RAM 15%
3D rendering: CPU 35%, GPU 55%, RAM 10%
General use: CPU 50%, GPU 30%, RAM 20%
This is the part many tools skip. You get a result that matches what you selected, not a one-size guess.
Step 2: RAM Score (Capacity + DDR5 Bonus)
RAM gets its own score based on capacity:128 GB = 100, 64 GB = 95, 32 GB = 85, 16 GB = 70, 8 GB = 45
If you pick DDR5, the RAM score gets a 10% bonus (multiplied by 1.1). That helps separate DDR4 vs DDR5 builds without pretending memory type beats everything else.
Steps 3–4: Normalize Scores and Calculate Overall Score
To keep the scale consistent, component scores are capped at 100 for the bottleneck math:
normalizedScore = min(score, 100)
Then the calculator computes the overall score using the weights from Step 1:overallScore = round(cpuNorm × cpuWeight + gpuNorm × gpuWeight + ramNorm × ramWeight)
Step 5: Bottleneck Detection Logic
Next, it decides what limits the build. It checks in this order:
- RAM bottleneck: If the RAM score is more than 25 points below both CPU and GPU, RAM becomes the bottleneck. Percentage =
(1 − ramScore / max(cpuScore, gpuScore)) × 100, capped at 95%. - Balanced: If the CPU and GPU differ by 10 points or less, the build is balanced. Percentage =
scoreDiff × 0.5(so it lands in the 0–5% range). - CPU bottleneck: If the CPU score is lower than GPU score and the gap is over 10:
(1 − cpuScore / gpuScore) × 100 × 1.2, capped at 95%. - GPU bottleneck: If the GPU score is lower than CPU score and the gap is over 10:
(1 − gpuScore / cpuScore) × 100 × 1.2, capped at 95%.
The 1.2 multiplier makes differences easier to see in the UI.
Steps 6–8: Utilization, Recommendations, and Verdict Bands
Utilization is estimated for clarity:
- Bottleneck part: 95–100%
- Non-bottleneck part: 40–70% (scaled by score ratio)
- Balanced: 60–80%
Then the tool generates recommendations based on the limiting part, severity, purpose, resolution, CPU cores, GPU VRAM needs, and RAM capacity.
Verdict bands: 0–5% excellent, 6–15% good, 16–30% moderate, 31–50% significant, 51%+ severe.
FPS Estimation System (8 Games, Per-Game CPU/GPU Weights)
The FPS tab gives you quick expectations across popular titles at your chosen resolution. It uses base FPS values from a mid-range reference system (roughly score 100 for both CPU and GPU), then scales up or down using your selected parts.
Games included: Cyberpunk 2077, Fortnite, CS2, GTA V, Red Dead Redemption 2, Valorant, Elden Ring, Call of Duty: Warzone.
| Game | 1080p | 1440p | 4K | CPU/GPU Weight |
|---|---|---|---|---|
| Cyberpunk 2077 | 85 | 60 | 35 | 30% / 70% |
| Fortnite | 165 | 120 | 70 | 45% / 55% |
| CS2 | 280 | 200 | 120 | 55% / 45% |
| GTA V | 130 | 95 | 55 | 35% / 65% |
| RDR2 | 75 | 55 | 30 | 30% / 70% |
| Valorant | 350 | 260 | 160 | 60% / 40% |
| Elden Ring | 60 | 55 | 40 | 35% / 65% |
| Warzone | 120 | 90 | 50 | 35% / 65% |
How the scaling works
- CPU factor = min(cpuScore / 100, 1.1)
- GPU factor = min(gpuScore / 100, 1.15)
- adjustedFps = baseFps × (cpuFactor × cpuWeight + gpuFactor × gpuWeight), rounded
FPS rating labels
- 144+ excellent
- 90–143 great
- 60–89 good
- 30–59 playable
- <30 low
These are estimates. Your real FPS changes with settings, drivers, background apps, cooling, and patches.
PSU Recommendation Engine (TDP + Overhead + Headroom)
A bottleneck check is only useful if your system can run stable. The PSU tab estimates how much power your build needs and adds safety room for spikes.
Here’s the method:
- System overhead: a fixed 75W for the motherboard, fans, storage, and peripherals.
- Total draw (TDP-based):
totalTDP = CPU TDP + GPU TDP + 75W - Headroom: add 25%
headroomTarget = totalTDP × 1.25
This buffer helps with transient spikes, PSU efficiency losses, and small future upgrades. - Snap to standard PSU sizes:
The tool picks the smallest unit that meets the target: 450W, 550W, 650W, 750W, 850W, 1000W, 1200W, 1500W. - Headroom percentage:
headroom% = ((recommendedPSU − totalTDP) / recommendedPSU) × 100
Example: i9-14900K (253W) + RTX 4090 (450W) + 75W = 778W.
778 × 1.25 = 973W, so the tool selects 1000W. That leaves about 22% headroom.
For most modern builds, an 80+ Gold PSU is a solid baseline for efficiency and stability.
Component Swap Suggestions (Better Matches in One Click)
If your result shows a clear mismatch, you don’t need to guess the next upgrade. The swap tab gives you two quick paths:
- Best CPUs for your GPU: keeps your current graphics card and suggests CPUs that pair better with it.
- Best GPUs for your CPU: keeps your processor and suggests GPUs that fit its performance tier.
The matching rules are simple and consistent. The tool compares performancescore values and looks for the closest fit, based on the same purpose and resolution you selected. You’ll see the top three options, not a long list you’ll never finish.
When you click a suggested swap, the calculator updates your build and runs the numbers again right away. Your bottleneck percentage, overall score, utilization bars, and verdict refresh on the spot, so you can see whether the change fixes the imbalance. It’s a fast way to compare “keep CPU, change GPU” versus “keep GPU, change CPU” without opening ten tabs or rebuilding the inputs from scratch.
Historical Generation Comparison (How Much Newer Gen Helps)
Sometimes the best upgrade is simply “newer, same tier.” The generation comparison tool shows what you gain by moving to a newer CPU or GPU generation from the same vendor.
It starts with a simple hierarchy (for example, Intel 10th → 14th gen, or NVIDIA Ampere → Ada → Blackwell). Then it finds a nearby older-gen match based on performancescore. That keeps the comparison fair. You’re not comparing a budget chip to a flagship part.
The result is shown as an improvement percentage, so you can judge the upgrade value quickly. If the tool can’t find a reasonable previous-gen match for your selection, it tells you that no historical comparison is available for that part yet.
Build Presets (8 Real-World Starting Points)
Not sure where to begin? Presets give you a clean starting point. Each preset is a realistic CPU + GPU + RAM combo built around a common goal, from budget to high-end. Click one and the calculator auto-fills the parts, memory, and a sensible baseline setup. You can still change anything after that.
Here are the eight tiers in plain language:
- Budget 1080p gamer: entry-level parts that hit solid FPS on competitive settings
- Esports high-FPS: stronger CPU focus for 144–240Hz play
- Balanced 1440p: the “sweet spot” mix for modern games
- 4K focused: GPU-heavy for higher resolution loads
- Streaming-ready: extra CPU and RAM balance for game + encode
- Video editing: steadier timeline performance and multitasking headroom
- 3D rendering: more weight on sustained compute and GPU throughput
- Flagship build: top-tier parts for max settings and future upgrades
Each preset includes a color badge so you can spot the tier at a glance.
Build Comparison (Saved vs Current, Side-by-Side)
When you’re testing upgrades, it’s easy to forget what you started with. The comparison feature fixes that.
First, enter your current build and click SaveBuild. Then try changes: swap the CPU, bump RAM, change resolution, or pick a different GPU. When you toggle Compare, the tool shows saved vs current side-by-side.
You’ll see the key differences in one view:
- CPU, GPU, and RAM selections
- Bottleneck % and overall score
- verdict label and utilization bars
- any change in recommendations
Privacy stays straightforward. The saved building is held only for the current session. It clears on refresh and isn’t stored as a permanent profile.
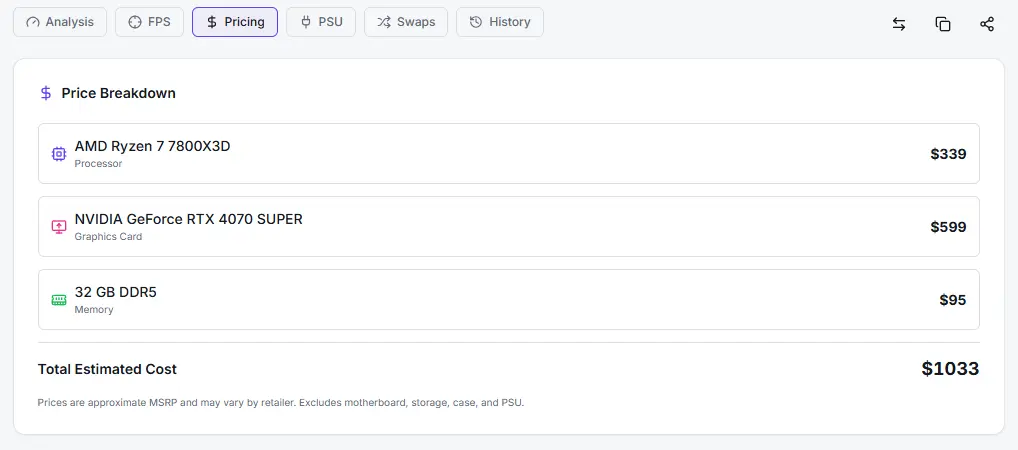
Pricing Tab (Approximate MSRP, What’s Included and Not)
The pricing tab gives you a fast budget check for the core parts that drive performance. It adds up CPU + GPU + RAM using approximate MSRP-style estimates tied to the components in the selector.
Keep the scope in mind. This total does not include your motherboard, storage, case, cooler, fans, power supply, Windows license, or monitor. It also won’t reflect real-time sales, used-market prices, or region-based markups. Think of it as a clean baseline for comparing builds, not a checkout total.
You don’t have to hit Calculate to see a number. As soon as you pick parts, the estimate updates so you can test swaps quickly. Want to see if a GPU upgrade still fits your budget after moving from 16 GB to 32 GB of RAM? You’ll get that answer in seconds.
Export and Share (Copy Text Summary + Shareable URL)
If you’re asking for advice, clean sharing matters. The export tools are built for that.
Copy Summary creates a formatted text block you can paste into a chat, forum post, or build thread. It includes your CPU, GPU, RAM, selected resolution and purpose, bottleneck percentage, overall score, verdict, key recommendations, and the PSU suggestion. That saves you from screenshots and back-and-forth questions.
Shareable URL is even simpler. The tool generates a link with your build stored in the query string. When someone opens it, the calculator auto-fills the same parts and settings so they see exactly what you saw. It’s useful for comparing two builds, sharing with a friend, or saving your upgrade ideas for later.
UI Features That Make the Tool Easier to Trust and Use
This tool is built to be quick, readable, and low friction.
You get a dark/light toggle, and the only thing saved with localStorage is that theme choice. Your component picks and results aren’t sent to a server.
The selectors are searchable dropdowns, so you can type a model name instead of scrolling for it. Results are visual on purpose: an animated gauge for quick severity, plus CPU/GPU/RAM usage bars so you can spot the limiting part fast.
Navigation stays clean with six result tabs. After you calculate, the page can auto-scroll you to the results area so you don’t hunt for the output. The layout is also responsive, so it stays usable on smaller screens and inside an embed.
Scoring and Rating Systems (How “Score” and Colors Work)
The calculator uses two simple rating layers: performance scores for parts and severity colors for results.
A performance score is a tier-style number used to compare components on the same scale. Higher scores represent stronger parts. In broad terms:
- Flagship-tier CPUs/GPUs sit near the top of the scale
- Mid-range parts land in the middle
- Entry-level parts sit lower
That score powers the overall score, swap suggestions, and generation comparisons. It’s designed for relative ranking, not promises of exact FPS.
Result colors are tied to bottleneck severity. Lower bottleneck percentages map to “healthy” colors, while higher percentages shift toward warning colors. Score cards follow the same idea, so you can scan a build quickly: strong balance looks calm, while a clear mismatch stands out.
Accuracy, Limitations, and How to Validate Your Result
A calculator can’t see your exact game patch, driver version, cooling, or background apps. Treat the result as a smart estimate, not a guarantee. Real-world performance shifts with settings, Windows updates, thermal behavior, power limits, and even the map you’re playing.
Use the calculator to narrow the problem, then validate it fast:
- Compare with real benchmarks for your exact game, resolution, and quality preset. Look for tests that show average FPS and 1% lows.
- Watch utilization and clocks in-game. If GPU utilization stays low while your CPU is slammed, you’re likely CPU-limited. If GPU is pinned and CPU has room, you’re likely GPU-limited.
- Check thermals and throttling. High temps can drop boost clocks and mimic a bottleneck. Watch CPU and GPU temperatures, then look for clock dips during stutters.
What makes this tool more trustworthy than “mystery percentage” calculators is transparency. It uses purpose and resolution weights, a defined RAM scoring step, clear bottleneck logic, and per-game CPU/GPU weighting in the FPS tab. You can understand what you’re seeing, then confirm it with real data.
How to Fix a Bottleneck (Decision Tree, Not Guesswork)
Start with your goal: resolution, refresh rate, and the workload you care about most. Then follow the bottleneck type.
CPU Bottleneck
- Consider raising resolution to shift load to GPU
- Reduce CPU-heavy settings (crowd density, view distance)
- Upgrade CPU — prioritize single-core strength
- Check monitor refresh rate (240Hz stresses CPU more)
GPU Bottleneck
- Lower resolution or GPU-heavy settings
- Turn off ray tracing, reduce shadows/AA
- Use upscaling (DLSS/FSR) if available
- Upgrade GPU or target a realistic FPS cap
RAM Bottleneck
- 8 → 16 GB is often the biggest jump
- 32 GB helps heavy multitasking and creator work
- DDR5 can help, but capacity matters more
- Confirm cooling — throttling mimics bottlenecks
FAQs
What to Do Next
Run one quick experiment. First, use the swap suggestions to test “keep CPU, upgrade GPU” versus “keep GPU, upgrade CPU.” Watch how the bottleneck percentage and verdict change. Then open the FPS tab and check a couple of games you play at your target resolution. If the numbers look close to your goal, you may not need hardware at all.
Before you spend money, verify one real benchmark. Use a reputable in-game benchmark or a well-documented review for the same game and settings. Pair that with in-game monitoring for utilization, clocks, and temps. Now you have a plan that’s based on your workload, not guesses.